WP Rocket Review and Tutorial: How I Sped Up My WordPress Website Without Coding
If your WordPress website feels slow, heavy, or difficult to optimize, this WP Rocket tutorial is for you.
In the video above, I tested WP Rocket directly on my own website, WP Roads (yes, the one you're visiting right now!), which is currently built with Elementor and has several active plugins. The goal was simple: install WP Rocket, enable the right settings, and see if it could really improve the performance scores on GTmetrix and PageSpeed Insights without touching code.
The results were impressive.


Feel free to take a ride on wproads.com, navigate the menu, click on CTA's and posts, see how WP Rocket is making this website ultra fast!
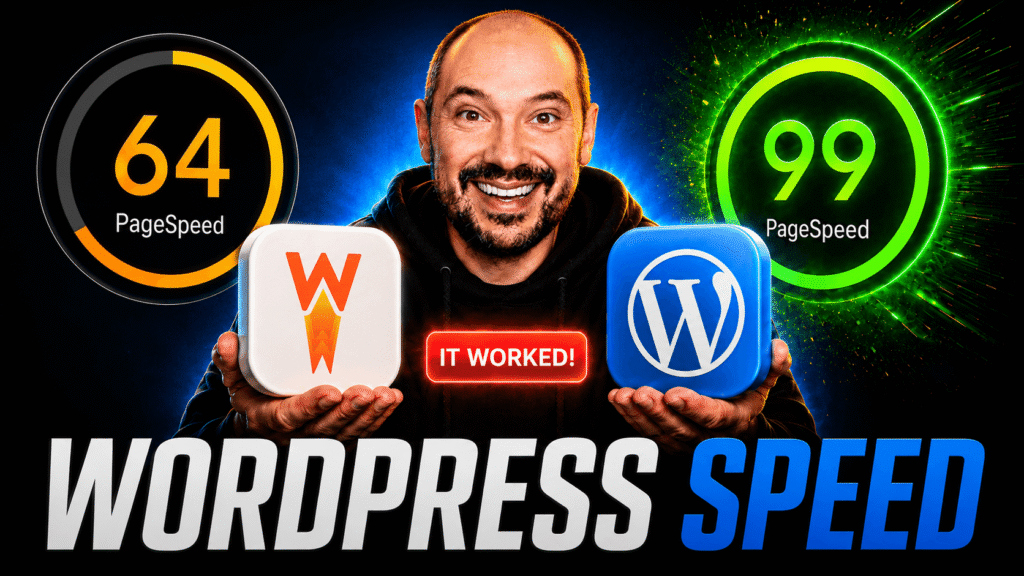
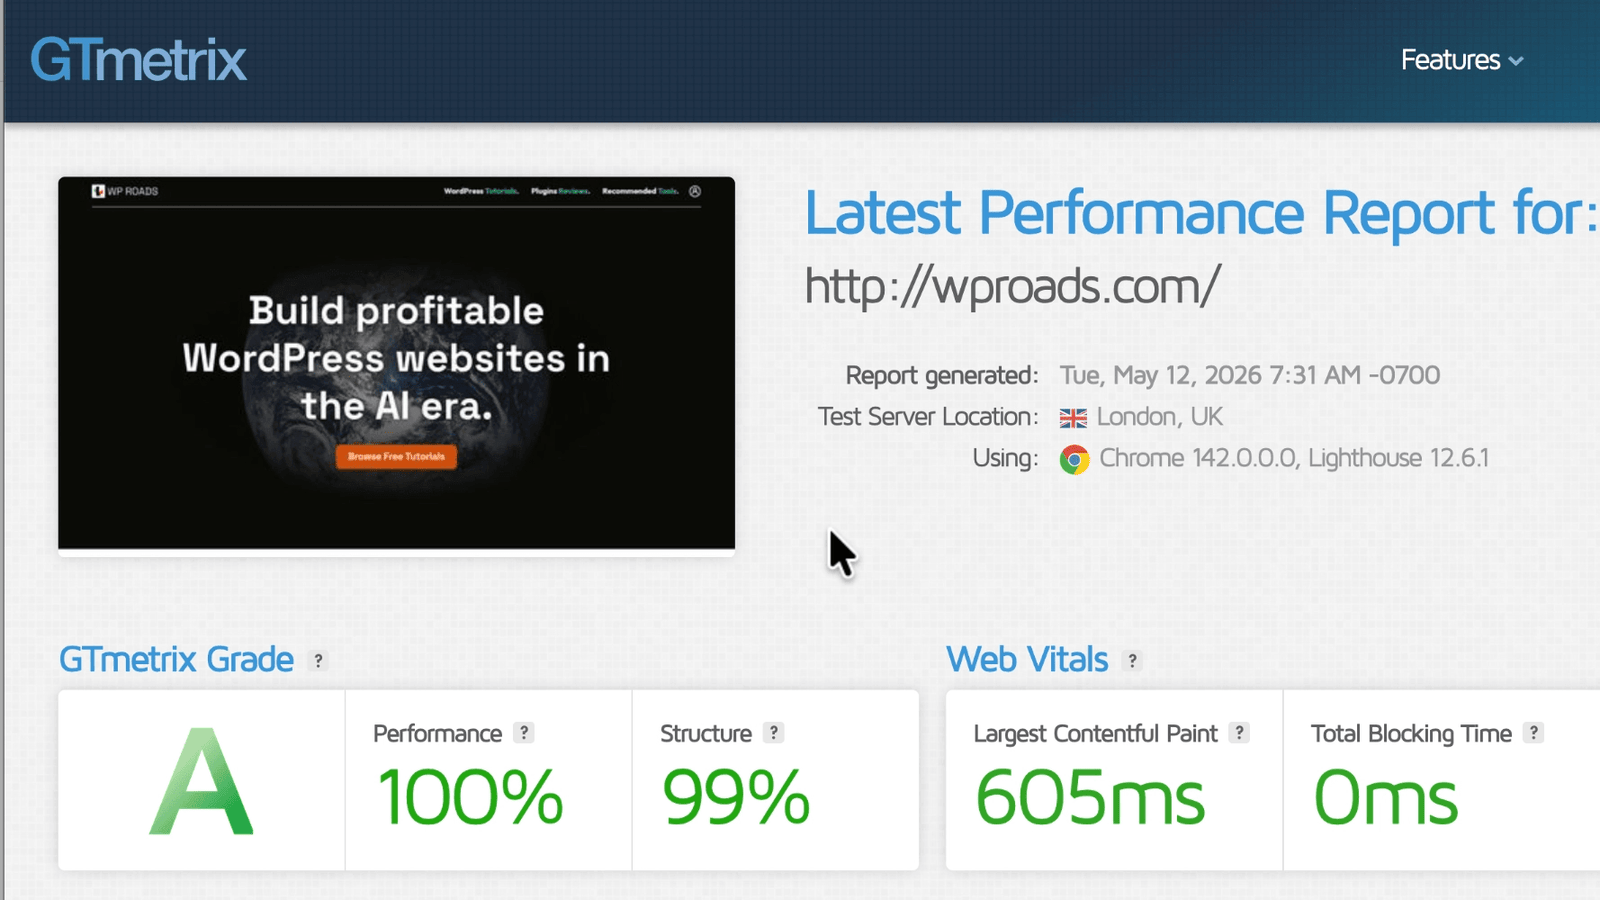
Before installing WP Rocket, the website scored 61% performance with a C grade on GTmetrix, and 64 on PageSpeed Insights mobile. After installing the plugin, the score improved immediately. Then, after enabling a few key optimization settings, the site reached a GTmetrix A grade, 100% performance, and a very fast Largest Contentful Paint.
The most important part? The website felt faster in real life, not only inside testing tools.
That is exactly what a good WordPress performance plugin should do.
What Is WP Rocket?
WP Rocket is a premium WordPress caching plugin designed to speed up WordPress websites with minimal configuration.
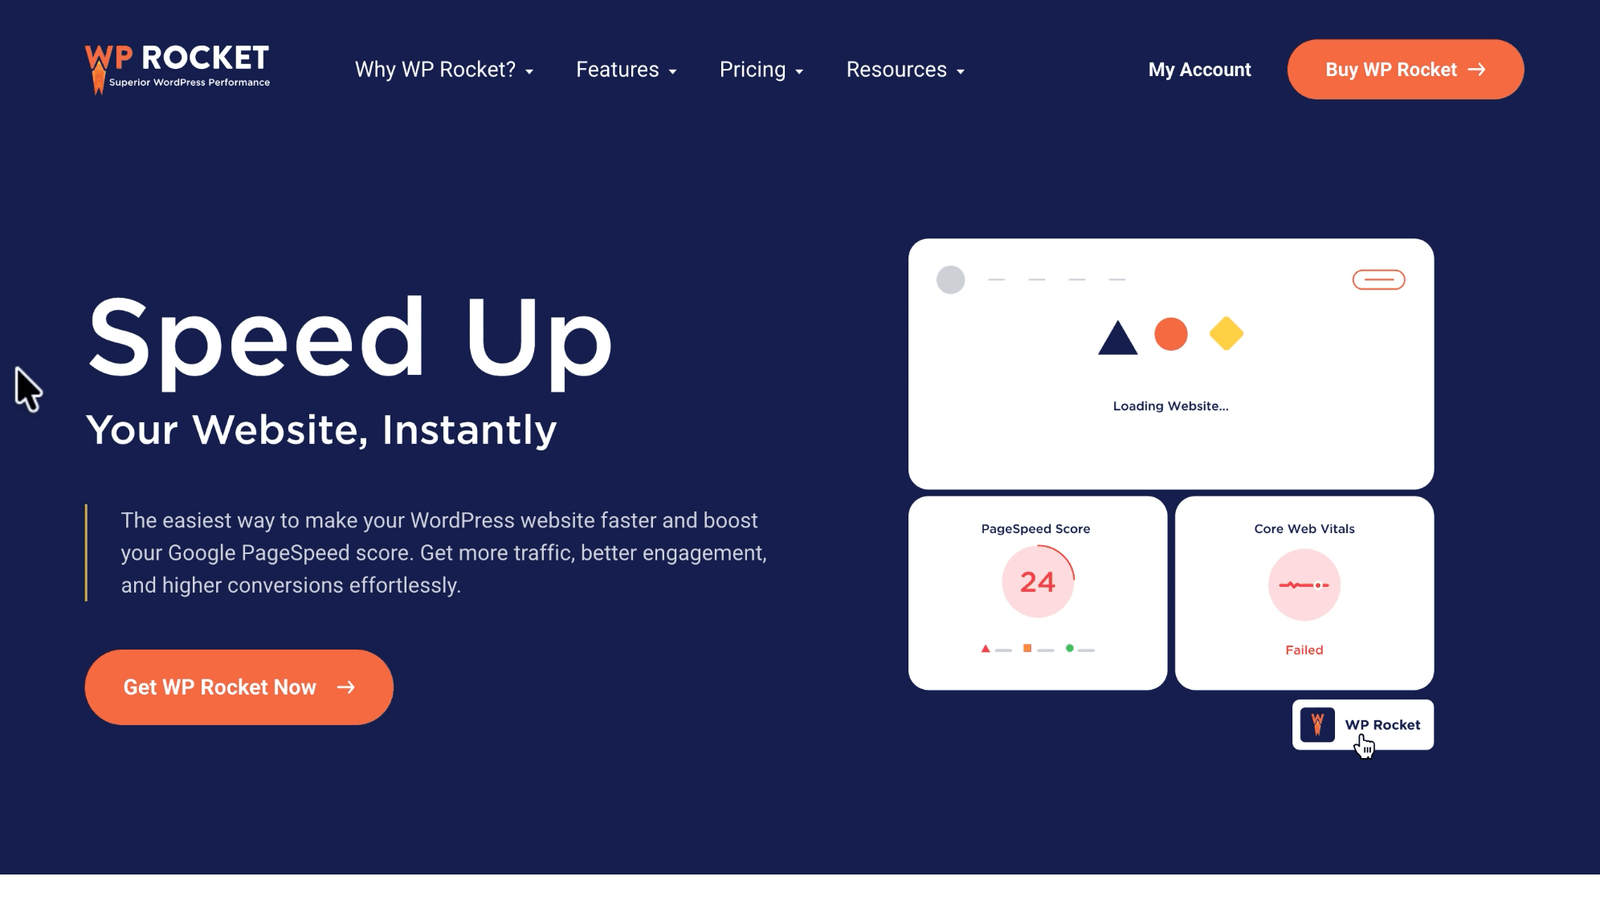
As soon as you install and activate it, WP Rocket applies several performance best practices automatically. This means that even beginners can start improving their website speed without dealing with complicated technical settings.
At the same time, the plugin also includes more advanced options for users who want to go deeper into file optimization, media loading, cache rules, database cleanup, CDN settings, Heartbeat control, and more.
This makes WP Rocket a good fit for different types of users:
Freelancers managing client websites, business owners running their own WordPress site, bloggers, WooCommerce store owners, and creators using Elementor who want a faster website without rebuilding everything from scratch.
If you are still setting up your WordPress stack, you can also check my Best WordPress Tools page where I share the plugins, hosting platforms, and services I personally use or recommend.
Why WordPress Speed Optimization Matters
Website speed is not just a technical detail.
A faster WordPress website can improve the user experience, reduce bounce rate, increase conversions, and support your SEO strategy. When people click on your website and it loads instantly, they are more likely to stay, read, subscribe, buy, or contact you.
Performance also matters for technical SEO. Tools like PageSpeed Insights and GTmetrix help you understand how your website performs, especially around important metrics like Largest Contentful Paint, blocking resources, JavaScript execution, and overall loading time.
If you are already working on your website SEO, performance should be part of the same strategy. For example, after improving your speed, you can continue optimizing your content and technical SEO with my Rank Math SEO plugin tutorial.
My WP Rocket Test Results
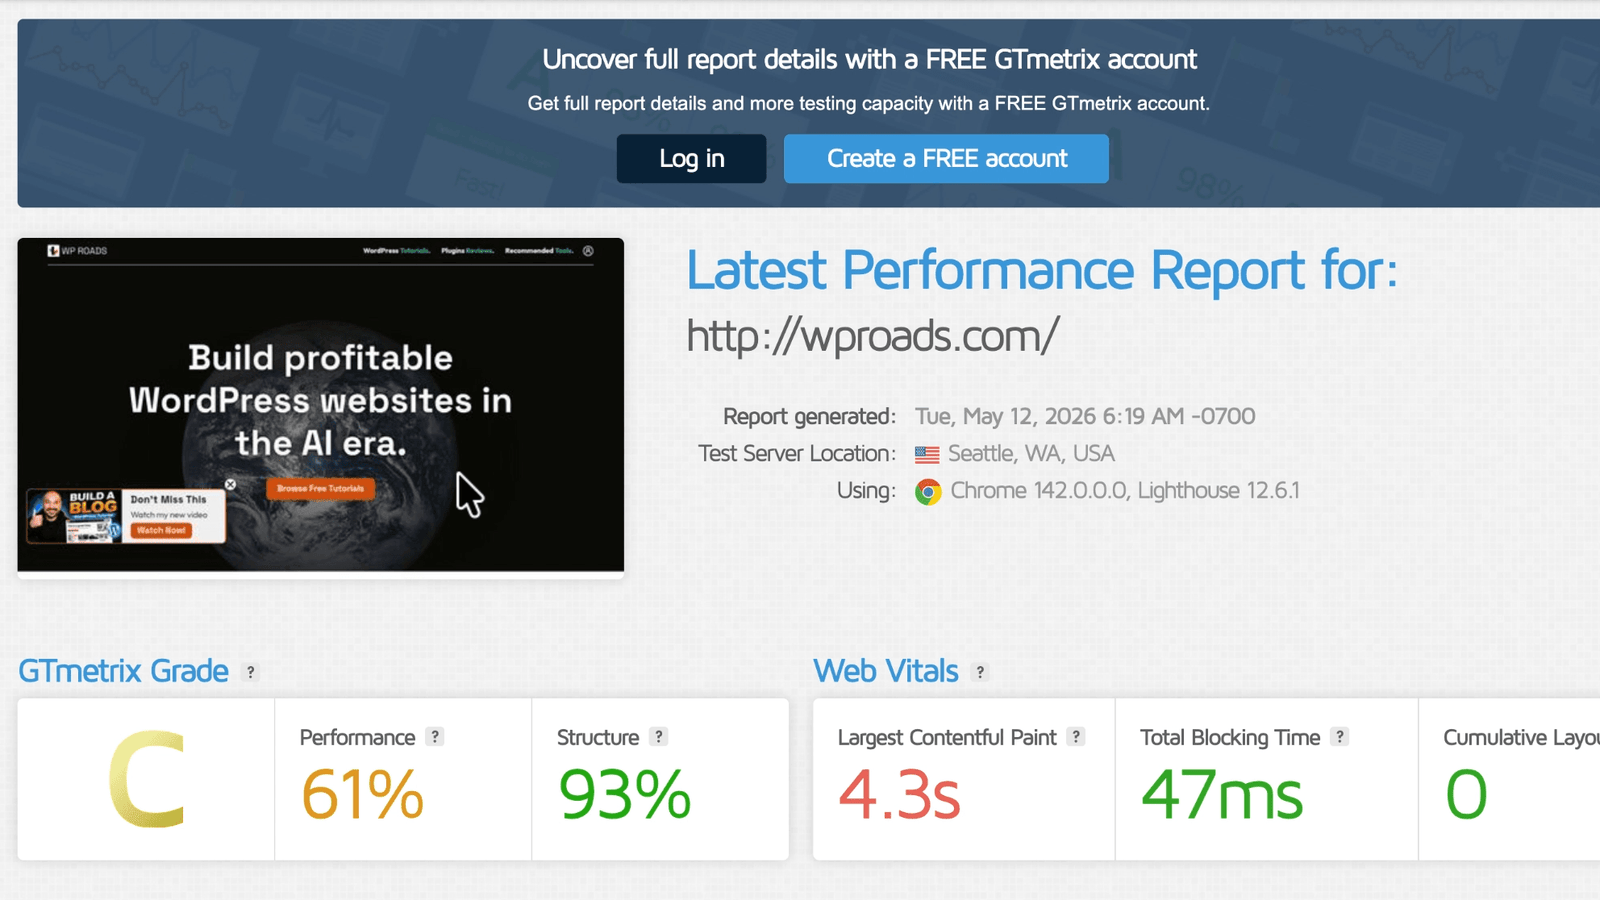
Before installing WP Rocket, my website had a GTmetrix C grade with 61% performance. The Largest Contentful Paint was around 4.3 seconds, which was definitely too slow.
On PageSpeed Insights, the mobile score was 64, with a very high Largest Contentful Paint.
After installing WP Rocket, without manually configuring anything, the website already improved. GTmetrix went from C to B, and the performance score increased from 61% to 73%. PageSpeed Insights also improved.
This is one of the things I liked most during the test: WP Rocket starts working immediately.
Then, after enabling a few additional settings inside the plugin, the performance improved even more. The final result was a GTmetrix A grade, 100% performance, and a much faster real browsing experience.
Of course, results can vary depending on your theme, hosting, plugins, images, page builder, and third-party scripts. But in this test, WP Rocket clearly made my WordPress website load faster with very little effort.
How to Install WP Rocket on WordPress
After purchasing WP Rocket, you can download the plugin from your WP Rocket account.
Then, inside your WordPress dashboard:
Go to Plugins → Add New → Upload Plugin.
Upload the WP Rocket ZIP file, install it, and activate the plugin.
Once activated, WP Rocket automatically applies a set of default performance optimizations. This is already enough to see an improvement on many websites.
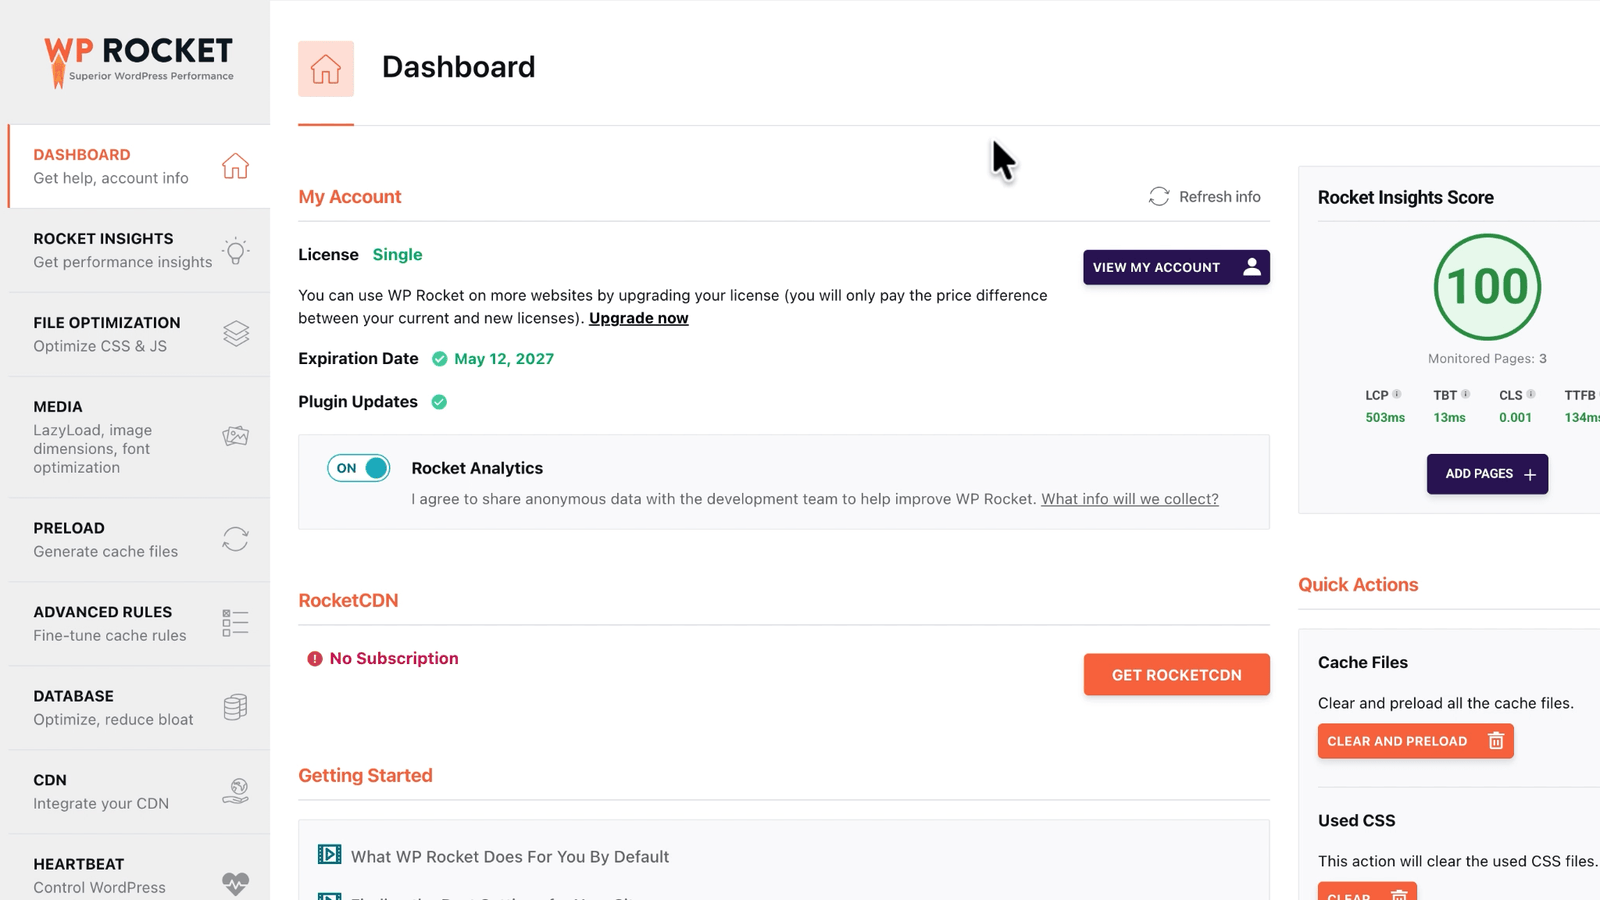
After activation, you will find the WP Rocket dashboard inside your WordPress admin area. From there, you can manage all the main performance settings using a clean and intuitive interface.
WP Rocket also includes Rocket Insights (based on GTmetrix), which lets you monitor important performance values directly from your WordPress dashboard. This is very useful because you do not need to constantly jump between WordPress, GTmetrix, and PageSpeed Insights.
WP Rocket File Optimization Settings
The first important section to review is File Optimization.

Here, WP Rocket allows you to optimize CSS and JavaScript files. These settings can have a big impact on your PageSpeed score, but they also need to be tested carefully because they can occasionally break the design or functionality of a website.
In the video, I enabled options such as:
Minify CSS files, optimize CSS delivery, minify JavaScript files, load JavaScript deferred, and delay JavaScript execution.
The Delay JavaScript Execution option was one of the most powerful settings in my test. It helped improve the score significantly, but it is also the kind of setting that requires attention.

Why?
Because some scripts need to load immediately. For example, analytics scripts, tracking tools, Stripe checkout elements, popups, sliders, or Elementor widgets may need to be excluded if something does not work correctly after enabling the delay.
My recommendation is simple: enable one optimization at a time, save the changes, then check your website from the front end in an incognito window.
Do not just trust the score. Click around your website. Open your homepage, blog posts, tools pages, landing pages, checkout pages, and any important templates.
If you use Elementor heavily, you may also enjoy my Elementor landing page tutorial, where performance and structure are important parts of building a clean, conversion-focused page.
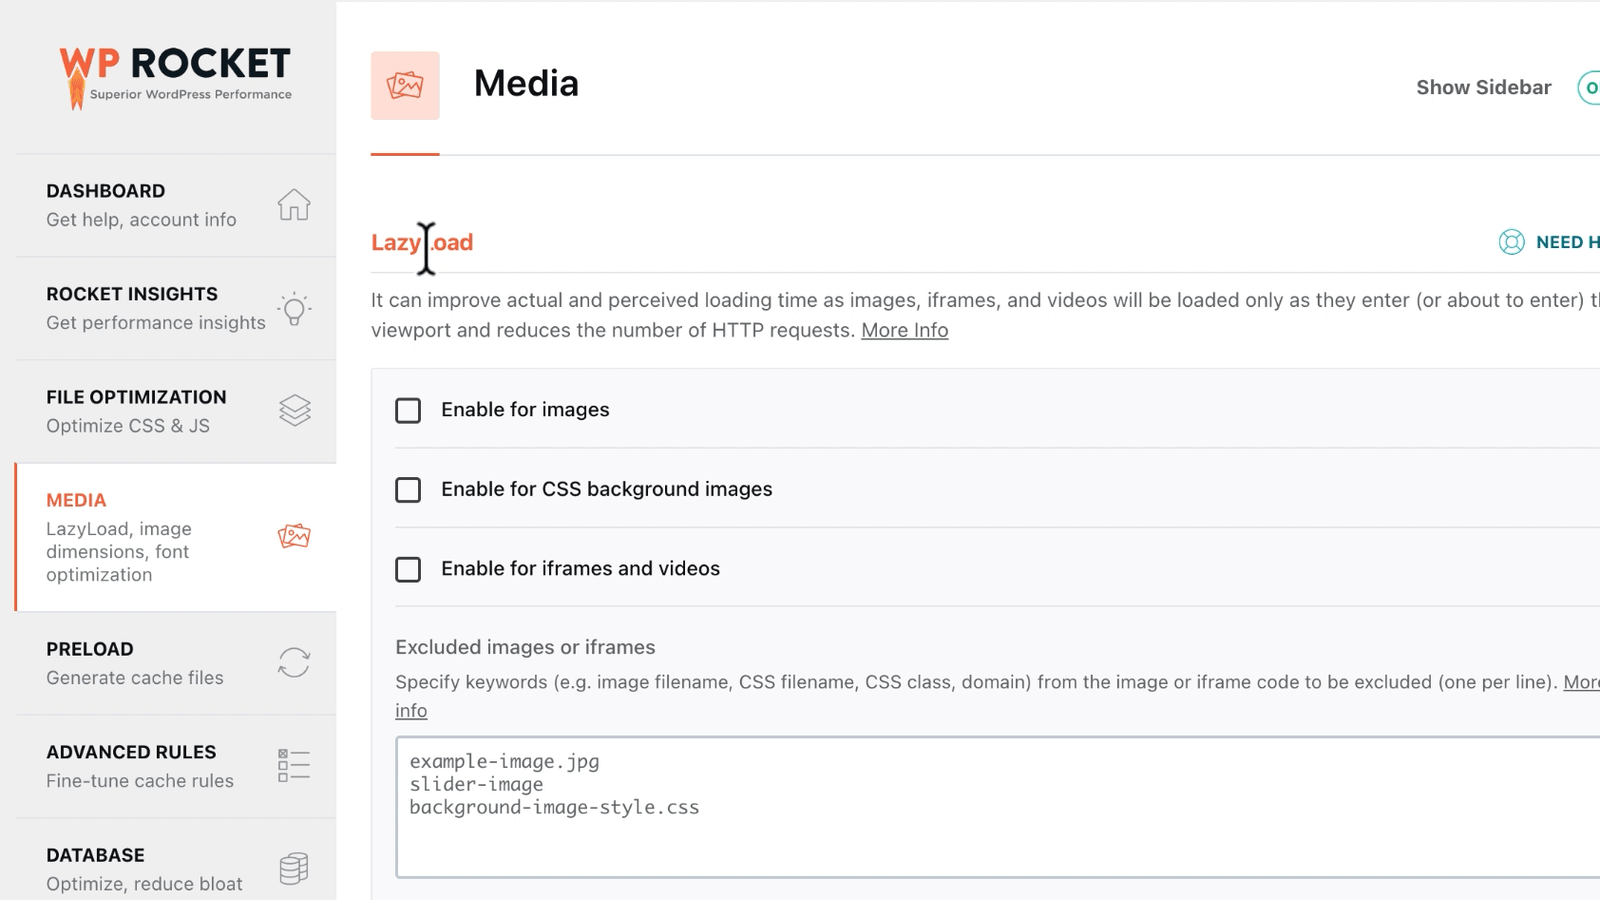
WP Rocket Media Optimization
Images and videos are often among the heaviest elements on a WordPress website.
Inside the Media section, WP Rocket lets you enable lazy loading for images, CSS background images, iframes, and videos. This is especially helpful if you embed YouTube videos, because loading a full YouTube iframe can slow down a page.
One very useful option is replacing YouTube iframes with a preview image. This can make pages feel much faster because the video only loads when the visitor interacts with it.
In the same section, WP Rocket can also add missing image dimensions, preload fonts, and self-host Google Fonts.
These settings are very helpful for reducing layout shifts and improving the way the browser loads important assets.
If your website uses a lot of visual design, Elementor sections, background images, and custom layouts, this part is especially important. A beautiful website still needs to feel fast.
For a better design foundation, you can also check my guide on how to create a design system in Elementor Pro, which helps you build more consistent and scalable websites.
Cache, Preload, and Advanced Rules
Caching is one of the core features of WP Rocket.
The plugin can generate static cache files for your pages, so visitors do not need to wait for WordPress to rebuild everything dynamically every time they visit your site.
In the Preload section, WP Rocket can automatically preload your cache and preload links, making navigation feel faster.
You can also configure the cache lifespan. If your website changes frequently, you may want a shorter cache duration. If your content does not change often, you can keep a longer duration.
The Advanced Rules section is also important.
For example, you may want to exclude checkout pages, cart pages, account pages, or other dynamic pages from caching. This is especially important for e-commerce websites, membership websites, LMS platforms, or any site where logged-in users interact with personalized content.
If you are building stores with Elementor and WooCommerce, you can also read my Elementor WooCommerce checkout customization tutorial to better understand how checkout pages work and why they should be handled carefully.
Database Optimization
WP Rocket also includes database cleanup features.
In the Database section, you can remove auto-drafts, trashed posts, spam comments, trashed comments, expired transients, and other unnecessary data.

This can help keep your WordPress database cleaner, especially if your website has been active for a long time.
In my test, the website had many post revisions. Revisions can be useful because they allow you to recover previous versions of your content, but they can also bloat the database over time.
Before running any database cleanup, always make a full backup of your website.
This is very important. Performance optimization should never put your content or website stability at risk.
CDN, Heartbeat, and Add-ons
WP Rocket also includes CDN settings for websites with international traffic.
A CDN helps deliver your website files from locations closer to your visitors. This can improve loading speed for users coming from different countries or continents.
The Heartbeat section lets you reduce WordPress Heartbeat API activity. This can help protect server resources, especially on websites where the admin area or plugins generate frequent background requests.
WP Rocket also includes add-ons for specific use cases, such as user cache for logged-in users, Varnish support, and WebP compatibility.
You may not need every setting, but it is good to know they are available as your website grows.
Image Optimization With Imagify
WP Rocket also integrates with Imagify, an image optimization plugin from the same ecosystem.
Imagify can compress your images, convert them to modern formats like WebP, and resize large uploads automatically.
This matters because caching alone cannot solve everything. If your homepage contains huge images, your performance will still suffer.
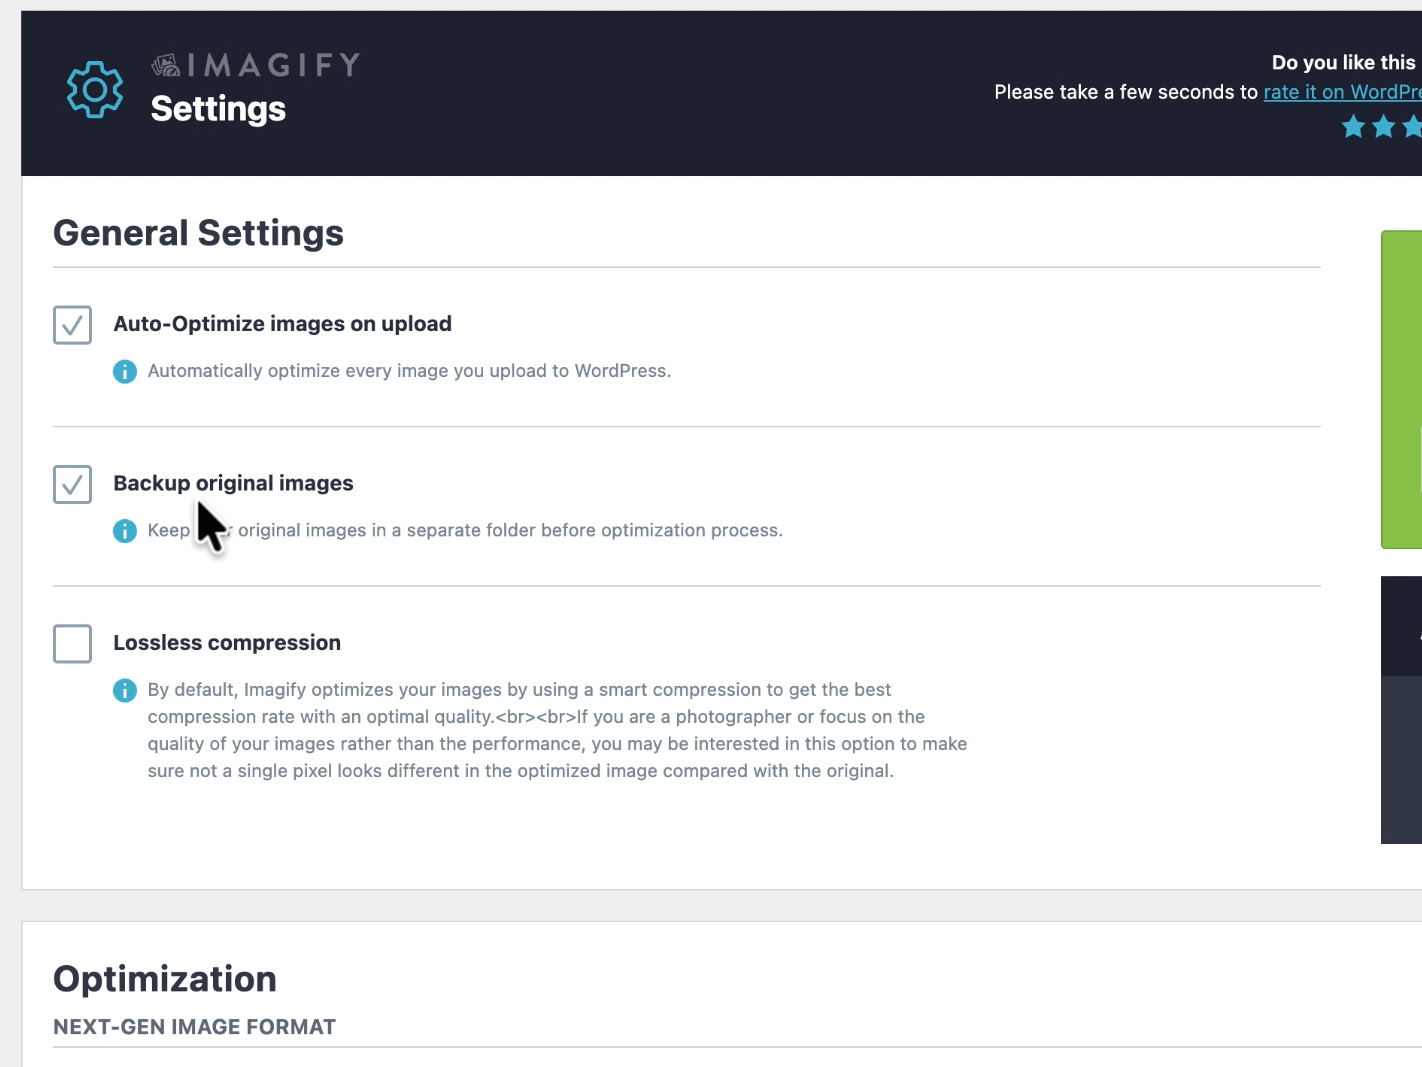
In the video, I installed Imagify, created an account, connected the API key, and configured basic image optimization settings.
For most websites, a good starting point is to optimize images on upload, keep a backup of original images, resize very large images, and use WebP when possible.
Just like with WP Rocket settings, test your website after enabling image optimization, especially if your theme or page builder handles images in a specific way.
Is WP Rocket Worth It?
Based on my test, yes, WP Rocket is absolutely worth considering if you want to optimize WordPress without coding.
What impressed me most is that the website became faster immediately after installation, and then improved even more after enabling the right settings.
It is simple enough for beginners, but still flexible enough for more advanced users who want to fine-tune CSS, JavaScript, cache rules, media optimization, and database cleanup.
It is especially useful if you are using Elementor, multiple plugins, marketing scripts, popups, or media-heavy pages and you want a practical way to improve your PageSpeed score without rebuilding your entire website.
Of course, WP Rocket is not magic. You still need good hosting, optimized images, clean plugin choices, and a well-built website structure. But it can make a huge difference, especially when your site is already built and you need a reliable WordPress caching plugin to improve performance quickly.
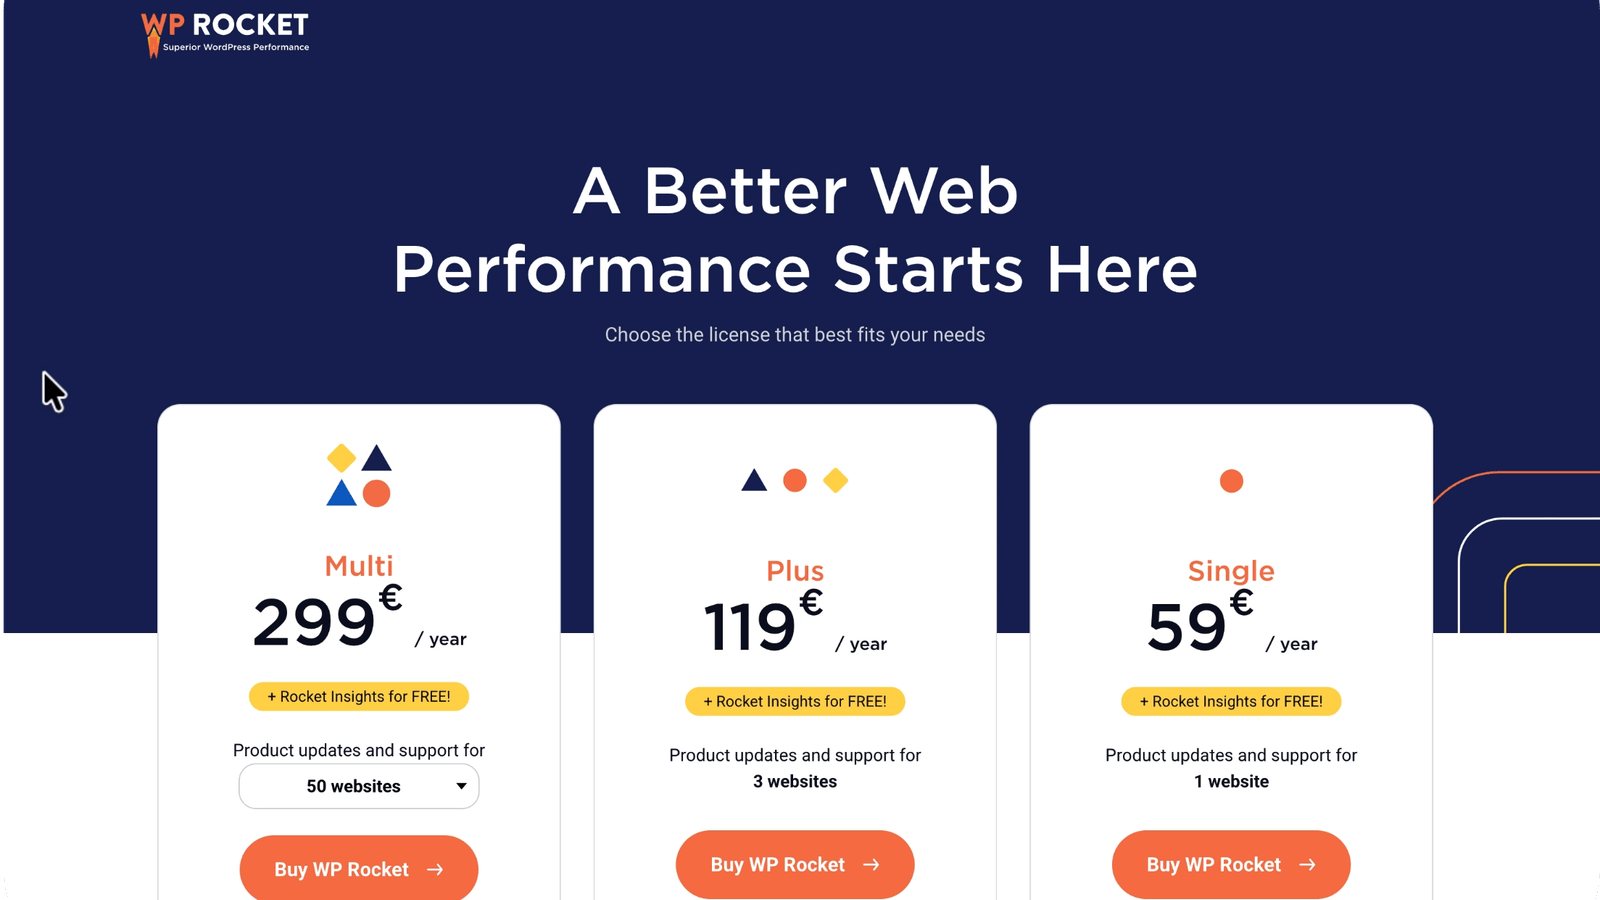
Pricing
WP Rocket starts at €59/year for one website, with higher plans available for 3 websites and 50 websites, which makes it flexible whether you are optimizing your own site or managing performance for clients.
But the real advantage is not only the price: it is the fact that you get a simple, preconfigured, actively supported WordPress performance plugin that is constantly patched, improved, and maintained by a dedicated team.
Instead of manually combining multiple caching, optimization, and performance tweaks from different plugins, WP Rocket gives you one clean dashboard with sensible defaults, reliable updates, compatibility work, and support when something does not behave as expected.
For beginners, this means faster results with less stress. For professionals, it means saving time and having a solid performance setup that can be reused across multiple WordPress projects.
Final Thoughts
This WP Rocket review and tutorial was a very practical test.
I started with my real WordPress website, measured the performance with GTmetrix and PageSpeed Insights, installed WP Rocket, enabled the most important settings, and tested the results again.
The improvement was clear.
The website loaded faster, the performance score improved, and the browsing experience felt much more responsive.
If your goal is to speed up a WordPress website, improve your PageSpeed score, reduce Largest Contentful Paint, and optimize WordPress without coding, WP Rocket is one of the most beginner-friendly and powerful tools you can try.
Start with the default settings, test your website, then enable the advanced optimizations step by step.
And most importantly, always check the real front-end experience.
Because at the end of the day, performance is not only about getting a beautiful score. It is about making your WordPress website feel faster, smoother, and more enjoyable for the people who visit it.
WP Rocket FAQ
-
Is WP Rocket still worth it for WordPress speed optimization in 2026?
Yes, WP Rocket is still one of the most practical WordPress performance plugins in 2026, especially if you want to improve website speed without coding. It combines several important optimizations in one plugin, including page caching, cache preloading, CSS and JavaScript optimization, lazy loading, database cleanup, CDN support, and performance monitoring. The biggest advantage is simplicity: instead of manually configuring several different plugins, you can start with WP Rocket’s default settings and then fine-tune the most important options step by step.
-
Can WP Rocket improve my PageSpeed Insights score?
WP Rocket can help improve your PageSpeed Insights score, especially if your website is slowed down by render-blocking CSS, heavy JavaScript, unoptimized media, or poor caching. In my test on WP Roads, the website improved significantly after installing WP Rocket and enabling the right settings. However, your final score also depends on your hosting, theme, plugins, images, fonts, third-party scripts, and page structure. The goal should not only be a higher score, but a website that actually loads faster for real visitors.
-
What are the best WP Rocket settings for Elementor websites?
For Elementor websites, a good starting point is to enable caching, cache preloading, lazy loading for images and videos, CSS optimization, and JavaScript optimization. The Delay JavaScript Execution option can be very powerful, but you should test it carefully because some Elementor widgets, sliders, popups, forms, or checkout elements may need to be excluded. After enabling each setting, open your website in an incognito window and test your homepage, landing pages, blog posts, menus, popups, and forms to make sure everything still works correctly.
-
Does WP Rocket replace image optimization plugins?
No, WP Rocket does not fully replace a dedicated image optimization plugin. WP Rocket can lazy load images, optimize CSS background images, replace YouTube iframes with preview images, add missing image dimensions, and improve how media is loaded. But if your images are too large, you still need to compress them and serve them in modern formats such as WebP. This is why using WP Rocket together with an image optimization plugin like Imagify can be a strong combination for improving WordPress performance.
-
Is WP Rocket good for beginners?
Yes, WP Rocket is beginner-friendly because it starts optimizing your WordPress website as soon as you activate it. You do not need to write code or understand every technical performance term to see an improvement. At the same time, it gives you advanced settings if you want to go deeper into file optimization, caching rules, preloading, database cleanup, and CDN configuration. For beginners, the best approach is to activate WP Rocket, test the website, then enable extra settings one by one while checking that the front end still works properly.